Fun camping adventure in the Anza-Borrego Desert State Park in southern California to see the explosion of color. Happy Spring!


Fun camping adventure in the Anza-Borrego Desert State Park in southern California to see the explosion of color. Happy Spring!

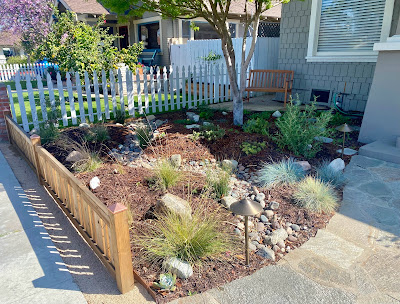
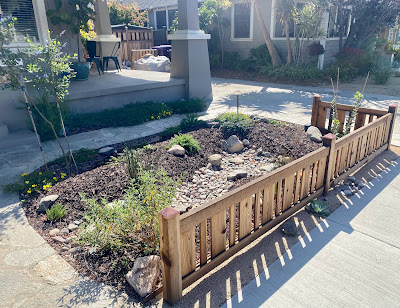
I am happy to write that our efforts are continuing to pay off and meet our goals. Gone are the white flies and aphids. We can now spot and name many native plants of California in their native landscapes. Gone is the constant need for watering and irrigation! We are shocked how little water the garden uses now. My biggest regret with the mostly-native landscaping effort is all the time and effort we invested to install an irrigation system. I did countless hours reading and researching to try to determine how much irrigation was necessary. There is much conflicting information out there, and little that guides on just what to do for urban native-plant landscapes. But, in the end I discovered that the real answer is next to no supplemental water is required. Once the native plants became established in our yard, they required little to no supplemental water beyond what nature provides.
Getting the plants established is absolutely key. Our experience is that it has everything to do with the time of planting. When we planted in the December through February timeframe then the plants needed negligible water and survived the spring-summer-fall dry season with little to no additional water. When we planted in the March through November timeframe, we found ourselves having to water much more with a higher likelihood of plant loss. It all comes down to planting and letting them get established during the winter rainy season.
The good news is that our irrigation zones in the native plant areas are completely shut off year-round now. The bad news is that we invested much time, money and effort to install all this infrastructure. If I had it all to do over again I would skip installing irrigation in the native plant areas. In the non-native areas, such as our vegetable garden, the drip/emitter water system works well and minimizes hand watering.
Conclusion: If you are planting native plants,then strongly consider skipping the installation of irrigation in these areas. For a higher rate of native plant growth and development, then plant in the winter months.
Happy gardening!
Life and new learning sometimes collide in interesting and mysterious ways. Sometimes the monotony of the still moments in life sends us on a quest for new learning, and sometimes new learning sends us into a spiral of activity that puts new spice back into life.
Sometime in the early 2020 timeframe, I found myself at home, sick, laying on the couch, and watching the PBS pledge drive. You know things are bad when you are watching a pledge drive. During this particular pledge drive, Suze Orman was the featured presenter and she was talking about retirement. If I remember right, she was talking about one of her new books - the Ultimate Retirement Guide.
I was listening to every other sentence as I dozed in and out on the couch when I heard her say, “don’t stuff all your money into the walls of your house.” Hmmm, don’t stuff all your money into the walls of your house!? Is that what we are doing? What is our plan? WHAT ARE WE DOING? Should we have a plan? How the heck are we going to retire? What does retirement even mean to us? YIKES!
Wow - that moment triggered an entire avalanche of new thinking, reading, researching and activity that has pretty much transformed our entire way of thinking. Now, I like Suze Orman, but this was only the tipping point and the catalyst for seeking answers for a whole lot of questions.
The next few years were quite challenging as we entered the pandemic, and life as we knew it changed. It was during that time that I developed the mantra, “creating options.” My partner and I had no idea what the future would hold, but we knew we wanted to have options coming out the other side of it. We were lucky enough to refinance our house before the interest rates increased drastically, and we took Suze’s advice and didn’t stuff the money into the walls. Instead, we set out to invest this money to create new options.
On this journey of new learning, I stumbled upon a video by JL Collins that further changed my thinking and triggered the next avalanche of transformation. The impact that JL has had on my life and my thinking is difficult to put into words. Financial independence (FI), retire early (RE), reducing one's footprint, simplifying, changing life phases, new learning and adventure. It is as if JL was able to take numerous themes that have been present at various points in my life and make them relatable, approachable and achievable. I went on to read the Simple Path to Wealth, and through this I learned about the 4% rule and various other guidelines that have enabled me to plan for the future. And, if you are going to plan for the future then you have to contemplate the future, and that’s where things get really interesting.
My goal for this blog is to widen the lens and share more about this journey we are on and our quest for wealth. A wealth of new experiences, options and opportunities. I will share some of our techniques and how we are working towards financial independence. Plus, you can count on continuing to see content around our home projects, woodworking efforts, gardening and travels. Thank you for reading.
It has been a very long hiatus from this blog - but much progress has been made on a number of fronts. Our interests and the complexities of life have taken us in many different directions lately, and often what we have to share and discuss don’t seem like a natural fit for this blog. However, on deeper reflection they do align to this blog since it has always been about learning, building, transforming and simplifying.
Therefore, my goal is to take this blog in a lifestyle direction and share more about our ambitions and path. In addition, I’ll work to increase posts about many of the topics that I love, such as woodworking, restoration, gardening, etc.
2023 was an absolutely transformative year. When we bought the house that we are currently in we actually bought 2 houses. The back house is a sunroom or better known as an additional dwelling unit (ADU). The property came with a whole host of complexities that I cannot even begin to describe here in this blog post. Nonetheless, it took us nearly four years to overcome and undo some of the misfortunes that plagued this property in the past. Both houses had been seriously cut up, neglected and treated as flop houses drawing many characters throughout the years each leaving a deep imprint. By the time we bought the property and stepped in the back house had suffered the most neglect and was in complete disrepair.
Well, all that changed in 2023. Finally, we were presented with an opportunity to shift our focus and bring this 700 square foot house back from the brink. We set out on a huge project, one that nearly consumed us and tested all of our skills. We hired out only the things we absolutely couldn’t do and did all the rest of the work ourselves. We did our best to bring back the character of the approximately 110 year old house. The end goal was to rent out this house as it is an important piece of our overall lifestyle plan (more on that in future posts). However, we knew that we wanted to attract the right tenant, one that has an appreciation for some of the nicer things a cared for historic home has to offer beyond the “landlord white” experience offered by most other rentals.
Here are the results -
Before:


After:


Here it is March, 2024 - and I am pleased to report that our work is paying off. The most difficult part of this project has been completing it. We are happy that it is done, but the work that went into it was so deeply satisfying that it has been difficult to move beyond it. There is nothing more satisfying than seeing a big project like this through to the end. I cannot begin to describe all the skills and life lessons learned. We look forward to the next big thing!
What would you guess this is?


Happy restoration!
It seemed that the interior wood finishing of our dining room would never get to final finishing stage. To recap, the woodwork of our 1914 craftsman home was under decades of paint. We started paint stripping in 2019 soon after purchasing the house. The situation went from bad to worse. Turns out that portions of the millwork had been sanded back to raw wood sometime in the 1950s (approx). There were several coats of lead based paint in direct contact with the wood, which makes it next to impossible to to remove the paint. Therefore, we resorted to sanding almost all of the millwork back to raw wood in the dining room.
Our goal is restore the millwork back to the early 1900s finishes. It is becoming harder and harder for the DIYer to find the products necessary to restore woodwork with the finishes that would've been used during that time period. Todays stains, gels and polyurethane finishes just don't reproduce the depth or richness found in historical finishes.
In comes Dalys. Dalys is a small scale finish manufacturer/producer located in the Pacific Northwest. It always helps to know a guy when you approach a project like this. Brian is our guy. During the summer of 2021 we sent a small piece of millwork to Brian at Dalys for finish matching. We also sent a sanded raw piece of matching millwork to him so that he could test his match. From there, he sent us the following finishing products:

Here, you see the following products:

In 2021 we undertook a sizable project tearing out our front yard and reconcepting it as a native garden. We have a small front yard of about 800 square feet. The purpose of the project was to simplify, beautify and reduce water consumption.
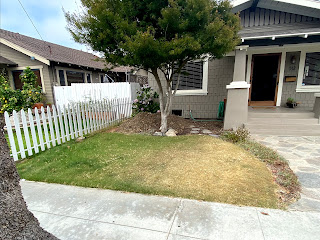
We did this project using the Long Beach Lawn2Garden program, and I would recommend it to anyone looking to convert lawn to garden. The process was straightforward and we experienced no challenges with the process.
We kept the plant list to plan with few exceptions. A full list of the plants used can be found here.