
Saturday, June 21, 2008
Friday, June 20, 2008
Rocking in the pond

working to get the rock perfectly situated.
Monday, June 16, 2008
Just add water

Next step is to decorate with rock. Stay tuned! I hope to have the water installed by Sunday evening :-)
We're getting the pond liner!
I spent most of the day Sunday installing plumbing. Now, I can purchase the liner!
One project is almost always connected to half a dozen other projects, and this case is no different. My long term plan is to install irrigation throughout the yard. There are two reasons I'm doing this. One, convenience. I love being able to go on vacation knowing my plants aren't dieing. Two, direct irrigation of plants saves water. Once I'm done, you'll be able to control the duration of each watering. That means I can give perennials less water than the annuals, etc.
For the plumbing, I ran three lines. The first line is the pressurized supply from the house. This PVC line will eventually run to a number of outdoor faucets as well as the irrigation control valves. The second line is for gray water. This PVC line runs from the back of the property to a faucet right beside the pond. I put the faucet in a ground level valve box, which can be landscaped around. Eventually, I plan on setting up a rain collection system, which can be used to top off the pond with water. This negates the need for dechlorinator, which is necessary if you use tap water. The third line runs from the deepest side of the pond to the head of the waterfall. This is a 1" flexible UV resistant line which will attach to the pump in the bottom of the pond, and pump the water up to the head of the waterfall. To top it all off, I also ran irrigation valve wire in the trenches. This is a low-voltage wire that runs from your irrigation controller to your valves. I went with a 7 strand cable (7/18AWG), which will allow me to control 6 valves from each run. This cable was a little more expensive, but I wanted to build the system in such a way that future valve expansion would be easy.
Purchasing the pond liner makes me nervous. The first time I built a pond, I measured wrong, and the liner I purchased was to small. This is not a cheap mistake. MEASURE, MEASURE, MEASURE, and MEASURE again! I couldn't afford to get a different liner, so I ended up filling in the pond some to make the liner fit. This time, I'm purchasing the EPDM line with an extra 5 feet on each side. This isn't cheap, but with a pond this big, I can't risk making a mistake. Besides, you can use the extra liner as a 'pad' on the bottom of the pond to sit rocks on. If you are building a pond, I recommend that you go large with your liner. If all else fails and your liner is to small, you can always fill in the bottom a bit. No one will ever know :-)
Saturday, June 14, 2008
Ding, the pond is dug

myself? Perhaps it's time to tear the ceiling out of the living
room :-) more on that project coming soon.
Friday, June 13, 2008

Sunday, June 8, 2008
Another feet deeper and what do you get?

express lane straight to hell. I've got a ways to go.
Dirt-R-Us

I decided first thing after purchasing the house that the backyard is to flat. I decided to fix this in a couple of different ways. First, I'd build elevation changes using dirt. I'd get the dirt by excavating the area for our pond. Second, I'd add dimension to the yard by using varying height landscaping.
 I started by building a half-mound of dirt against the fence. I contemplated building a full mound, but decided that the back of the mound would be wasted space, since it wouldn't be easily visible. To build the half mound, I began harvesting concrete chunks from around the yard that the previous owners left. Not to worry -- we'll have an endless supply on concrete chunks once we begin pulling out the driveway. I'll save that story for another day.
Kurt and I began stacking the concrete chunks against the fence. As with any mound, it has a high point and then slopes down on each side. Therefore, we built the wall to gradually slope up to a maximum of approximately 3 1/2 feet and then back down again. The base of the wall at the highest point is probably 2 feet thick, since it'll have a lot of soil stacked against it. This is my number one concern. If this stack ever collapses into the neighbors fence and yard, it's going to be a mess to fix.
Later this summer once we complete the process of excavating the pond, we'll build a waterfall whose head will be at the top of this mound. Once finished, no concrete chunks will be visible.
BREAKING NEWS: the doors are in!

information coming soon.
Saturday, June 7, 2008
Have that moved
My latest obsession was moving our shed. When we moved into the house, the thing I complained about the most was the shed. Within weeks, I had made my decision - I HATE THE SHED, AND IT SHOULD DIE. Thankfully, I'm not the type of person to jump to irrational conclusions /-:After staring at the damn shed for three months during winter, I finally backed away from the ledge and decided that the shed should live. I decided it would become my mission to make the shed not horrible. Step 1... move shed. The shed was built on site by the previous owners, who had no sense of balance beyond, "have that perfectly centered", which is exactly what they did with the shed (and everything else they touched. I won't even get started with the fact that they didn't move furniture away from the walls when they painted. Instead, they just painted around things. Seriously -- does it get more half-assed? Oh, back to the shed...). They positioned it right-smack in the middle of the yard with the peak of the roof facing the house. I continually asked myself, why does this positioning suck? First of all, there was no reason on earth why the shed should be perfectly centered. It wasted perfectly usable space to the left and right of the shed. Second, the shed roof pitch exactly mirrored that of the garage creating this perfect harmony of BLAH. GET IT OUT OF MY YARD.
 With that, we rotated the shed 90 degrees clockwise, and then pulled it closer to the garage. We also moved the shed out further away from our neighbors fence. If you are smart, then you should be asking why on earth I would waste so much perfectly usable space. Well, I determined that we needed a space in the yard to store compost bins, pots, wheel barrows, etc. A 10 foot by 12 foot "room" behind the shed would be an excellent place for a work area. It was hard for me to sacrifice the space, but let's face it, our yard is not small as it is.
There are a number of projects remaining. First, I'll install a gate between the shed and the garage that blocks the view of the mess that's behind and beside the garage. Second, the "front" of the shed seen from the house will have windows installed, and perhaps some craftsman light-sconces. Eventually, we're gonna build a natural stone patio to the right of the shed that will include an open fire pit for small fires. The view to the patio from the house will be obstructed by the zen-garden, which will include several types of bamboo, including timber bamboo.
As the shed sits now, I hate it much less. It still needs work, but at least it isn't centered. If you too have fallen victim to irrationally centered sheds, don't hesitate, MOVE IT!
Thursday, June 5, 2008
It was Summer last Week
With the teasing introduction to summer we've had here, our interior projects have slowed in favor of exterior projects.
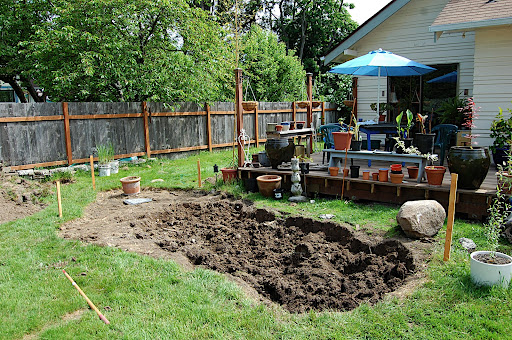
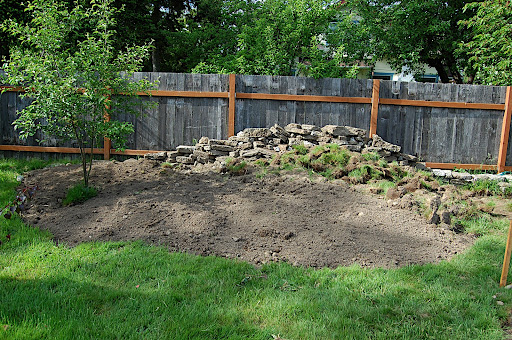
We have started to dig a pond just off the deck, and are using the fill dirt to build up the area our waterfall will cascade down from. We used concrete chunks to build up a retaining wall against our North property fence. Once the mound of dirt is finished, the concrete wall will not be visible. Our new pond is much bigger than our old pond in Seattle, which was constructed out of an old water bed frame that we found. Our new pond will reach a maximum depth of 3 feet, and is approximately 20 feet long and 12 feet wide. Once it's all done, it will be decorated in with large rocks, plants and landscaping.


We have started to dig a pond just off the deck, and are using the fill dirt to build up the area our waterfall will cascade down from. We used concrete chunks to build up a retaining wall against our North property fence. Once the mound of dirt is finished, the concrete wall will not be visible. Our new pond is much bigger than our old pond in Seattle, which was constructed out of an old water bed frame that we found. Our new pond will reach a maximum depth of 3 feet, and is approximately 20 feet long and 12 feet wide. Once it's all done, it will be decorated in with large rocks, plants and landscaping.
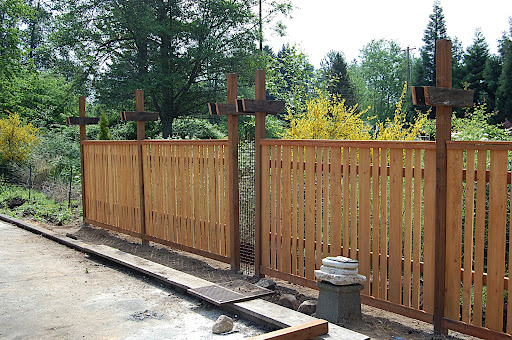
Boe whipped out 54 feet of the fence on Memorial day he's been planning for awhile. There are a couple of items remaining to complete the fence. He's going to add two cross horizontal pieces of trim boards onto the front of the fence to give it a more finished look. Then, he has to install the horizontal cross sections between the lentils at the top. And finally, he's going to trim in the trellis sections between the fence panels, which are made out of steel rock-sorting grates that I picked up from Second Use. All in all, we're very pleased with the outcome of the fence. Once it's finished off with landscaping and vines, it'll be a real masterpiece.
Subscribe to:
Posts (Atom)