In early August 2021, we received approval to move forward with our Lawn2Garden conversion. More info on the application and process can be found in this earlier blog entry.
Once receiving approval, we quickly jumped into action to implement the following landscape plan:
We used a long bright orange extension cord to lay out the size and shape of the swales prior to digging. You can also use a water hose for this. I find this important as it will help you establish an interesting and organic shape for your landscape elements.
It is also worth mentioning that we pulled in a 12v DC low voltage cable to run future landscape lighting. We also plumbed the yard with water for any future landscaping irrigation needs. We expect that we are not going to add irrigation because we are working towards a landscape that requires watering on 30 day intervals or less. We still decided to plumb water to the area in case it is needed at some point in the future.
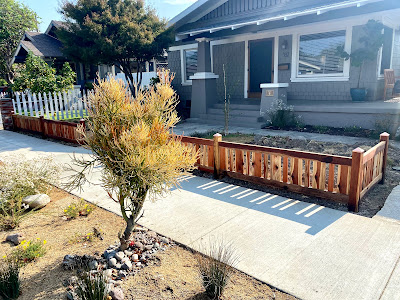
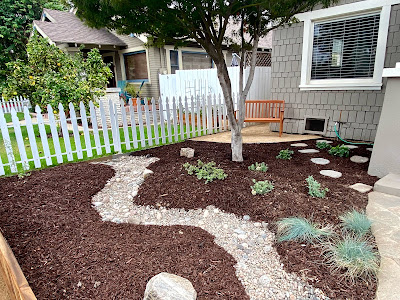
Once the swales and berms were established, we installed garden edging and selected landscape materials. We decided to use the following landscape materials: decomposed granite (DG), river rock (both small & large), bark mulch, and a dessert tan landscape rock. We will also use a number of small boulder rocks to add visual interest. We used a landscape edging made of carbon steel that will rust and disappear as a natural element into the landscape.
One of the biggest challenges with a lawn2garden conversion is how to get rid of the grass. We decided to use cardboard over the existing grass with both landscape rock or bark mulch over the top. The cardboard will kill the grass off underneath and it will compost into the soil. We determined this was the easiest and cheapest method for our project. We had been saving cardboard boxes for a good 6 months for this purpose. We supplemented our cardboard supply with a number of cheap moving boxes we picked up at Home Depot.
For the swales, we lined them with landscaping fabric prior to pouring in the rock. Pulling weeds out of rock is not a fun process and we decided that landscape fabric was the way to go for this area. However, we only used the landscape fabric in as few places as possible because we want the native plants to be able to spread and develop root systems without being impeded.
Before:
After:
We are extremely happy with the results. The berms adds a lot of visual interest and texture. We are excited about the swales and think they are both visually interesting and useful to capture rain water. The fence adds a beautiful design element that defines the space and harmonizes with the style of the house.
We are excited to begin planting. Earlier this week we reviewed our plant selections and will be making some changes. We found that the design on paper isn't an exact match to the physical space and therefore needs some minor tweaks. Be sure to allow yourself enough flexibility to evaluate your plan along the way. Seeing is believing and designs are meant to evolve. We expect to start planting in October and will post updates as that progresses.
From a timing perspective we have spent approximately 20 hours on our DIY front yard conversion. From a financial perspective, we have spent somewhere in the neighborhood of $700 on fencing materials and hardscaping supplies. Most all landscape supplies were purchased at our local Lowes.
It is all working! We've had so many people stop by wondering what we're doing and asking questions. We’re doing Lawn2Garden of course! Amazing to see so many people interested, and we hope our project can act as inspiration for others considering similar projects. Save water and beautify all at the same time!


