Monday, October 4, 2021

Front yard lighting

 Very happy to report that the landscape lighting is in!  Used Volt lighting that's available at a discount for Costco members.  Very high quality - forged brass lights.  Very sturdy and should last a long time.  All low voltage 12v system, so pretty easy to install.  It really adds a lot of drama to the space and makes it "dance" at night.  Fun easy project with a quick payoff.  


Tuesday, September 21, 2021

Lawn2Gaden Progress

In early August 2021, we received approval to move forward with our Lawn2Garden conversion.  More info on the application and process can be found in this earlier blog entry.

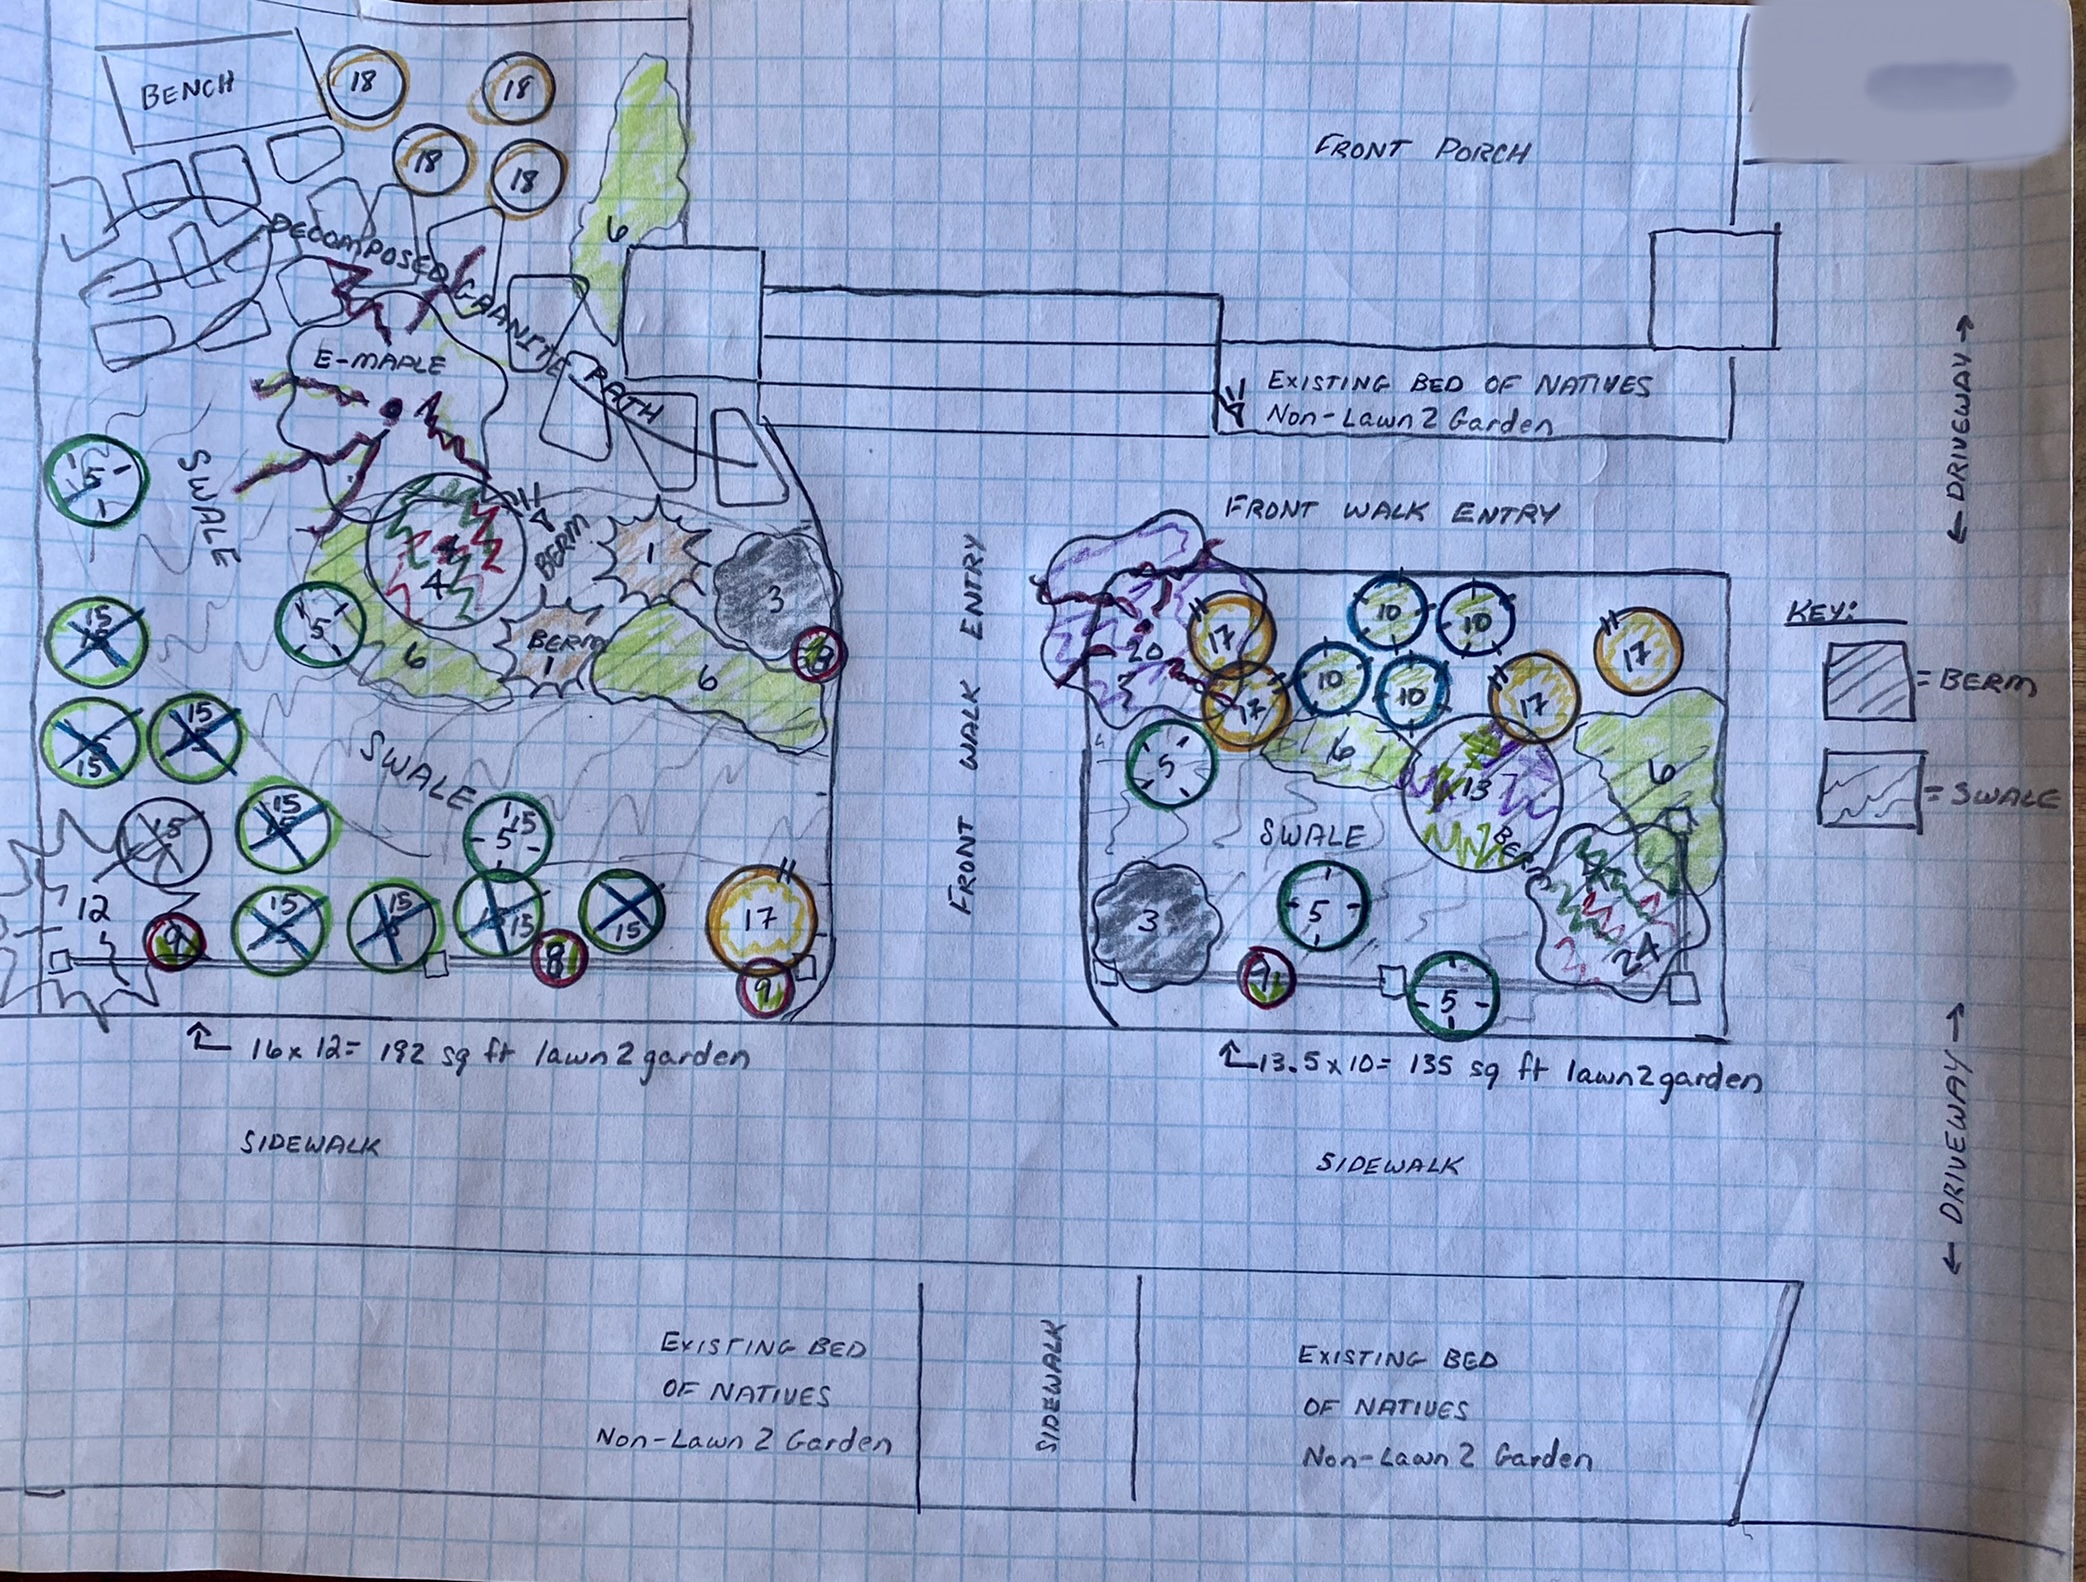
Once receiving approval, we quickly jumped into action to implement the following landscape plan:


We created this plan with help from Randi at Tree of Life Nursery to set the native plant palette.  I was already confident with what I wanted to do from an aesthetic/hardscaping perspective, but help identifying the plants made the design come together much faster.  

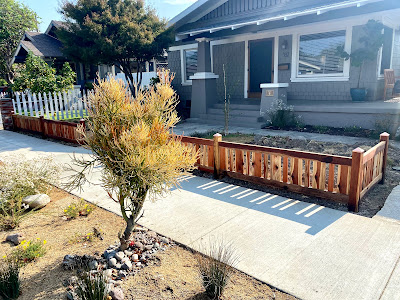
The design contained a number of hardscaping elements that we started implementing in August of this year.  First, we designed a small fence to better define the space.  We spent a number of weeks creating prototypes for the fence to get the height/width/design proportions just right.  In the end, we settled on a 24" high craftsman frame and panel fence made of redwood.  The wide/skinny slats are meant to emulate the wide/skinny shaker siding element on the house.  The copper post caps add warmth and a homemade craftsman feel.  The low to the ground design is meant to add definition without creating a sense of separation.  We hand crafted the fence and all of its components in our home workshop.


The design contained a large swale element that runs through and connects both sides of the front yard.  In addition, we incorporated a berm element to add depth and texture to the overall design.  Both swales are meant to be working elements and required work to tie them in with our drains.  During rains, gutter and driveway runoff is directed to pop-up drains that were tied in to the swales.  This will prevent excess water from entering the storm drains as runoff, and help recharge the soil with water so that the native plants can survive the summer months.  Think of the swales like a battery -- they charge up the ground with water so that the plants can pull from it during times of high demand.  Using a pick axe we began the process of digging through the hard sun baked soil to build the swales.  We used the excavated soil to build berm elements.  It is worth mentioning that we called 811 prior to digging to have the utilities marked. 


We used a long bright orange extension cord to lay out the size and shape of the swales prior to digging.  You can also use a water hose for this.  I find this important as it will help you establish an interesting and organic shape for your landscape elements.

It is also worth mentioning that we pulled in a 12v DC low voltage cable to run future landscape lighting.  We also plumbed the yard with water for any future landscaping irrigation needs.  We expect that we are not going to add irrigation because we are working towards a landscape that requires watering on 30 day intervals or less.  We still decided to plumb water to the area in case it is needed at some point in the future.

Once the swales and berms were established, we installed garden edging and selected landscape materials.  We decided to use the following landscape materials: decomposed granite (DG), river rock (both small & large), bark mulch, and a dessert tan landscape rock.  We will also use a number of small boulder rocks to add visual interest.  We used a landscape edging made of carbon steel that will rust and disappear as a natural element into the landscape.

One of the biggest challenges with a lawn2garden conversion is how to get rid of the grass.  We decided to use cardboard over the existing grass with both landscape rock or bark mulch over the top.  The cardboard will kill the grass off underneath and it will compost into the soil.  We determined this was the easiest and cheapest method for our project.  We had been saving cardboard boxes for a good 6 months for this purpose.  We supplemented our cardboard supply with a number of cheap moving boxes we picked up at Home Depot.

For the swales, we lined them with landscaping fabric prior to pouring in the rock.  Pulling weeds out of rock is not a fun process and we decided that landscape fabric was the way to go for this area.  However, we only used the landscape fabric in as few places as possible because we want the native plants to be able to spread and develop root systems without being impeded.

Before:


After:


We are extremely happy with the results.  The berms adds a lot of visual interest and texture.  We are excited about the swales and think they are both visually interesting and useful to capture rain water.  The fence adds a beautiful design element that defines the space and harmonizes with the style of the house.  

We are excited to begin planting.  Earlier this week we reviewed our plant selections and will be making some changes.  We found that the design on paper isn't an exact match to the physical space and therefore needs some minor tweaks.  Be sure to allow yourself enough flexibility to evaluate your plan along the way.  Seeing is believing and designs are meant to evolve.  We expect to start planting in October and will post updates as that progresses.

From a timing perspective we have spent approximately 20 hours on our DIY front yard conversion.  From a financial perspective, we have spent somewhere in the neighborhood of $700 on fencing materials and hardscaping supplies.  Most all landscape supplies were purchased at our local Lowes. 

It is all working!  We've had so many people stop by wondering what we're doing and asking questions.  We’re doing Lawn2Garden of course!  Amazing to see so many people interested, and we hope our project can act as inspiration for others considering similar projects.  Save water and beautify all at the same time!

Thursday, August 5, 2021

Summertime Highlights

 In addition to constantly working on our 1914 craftsman four-square, we do sometimes just step back and enjoy what we've accomplished.  It seems lately that maybe we don't take the time to do that enough.  Perhaps it is a pandemic related behavior?

The native plant landscape we planted in the Fall-Winter-Spring season of 2020/21 really leapt to life!  Here are some photos to show the progress:

View from the side-yard entry gate coming into the yard.  The potted Burroughsia Fastigiata is hands down one of my favorite plants.

This photo features much of the hardscaping that we did ourselves in 2020.  My back still hurts.

In the background, our vegetable garden with higher-water demand plants.  In the foreground, an old peach tree underplanted with California natives.

A vegetable garden closeup.  Mid-right side is the Baccharis emoryi which is a wonderful bee attractor.

In line with our need to enjoy life more and not to just work all the time -- we built an outdoor bar as part of our botanical entertainment backyard complex :).  This project tested our tile and woodworking skills and we couldn't be happier with the end result.  


Bar side: notice the shingles that pattern match the house.  We're very pleased with how that turned out.

Redwood construction.  The door panels are common redwood fence boards that we ran through the planer for a more artsy finished look.

The beautiful tile work that my partner completed.  Very vibrant and perfect for the space.

And yes, we're still working on the indoor paint stripping.  In between paint stripping shifts we like to go  outside and enjoy a cocktail or two.  Or three.  Rarely five.  We have made tremendous progress on the dining room woodwork paint stripping and will soon begin dying, staining and shellac'ing.  We recently sent a piece of originally stained trim in to a stain match expert I've worked with in the past when completing other restoration projects.  Receiving the stain has been delayed because there is a national paint can shortage that is severely impacting small producers.  Who knew!?!?!  Like everything in 2020 and 2021 -- one must apply patience and learn to go with it and not against it.  The delay is allowing us to enjoy more drinks at our custom built bar!  See.... there are benefits to being delayed.  It is helping me be more in touch with the concept of maƱana ~ maybe tomorrow and maybe never.

Hope readers are enjoying the summer as we are.  Keep keeping on.


Thursday, July 29, 2021

Lawn2Garden

 Earlier this year I wrote about the Lawn2Garden effort to convert our remaining grass lawn into planted landscape area.  Since then, I've decided to leverage the Long Beach Lawn to Garden program to complete this conversion and to see what the process is like to leverage this resource.  The conversion was something we were planning to do with or without the official city program, but I felt that it would be worth it to document the experience so that others can benefit from this information.

In June of 2021 I submitted the Lawn2Garden application for our 271 square feet of grass and it was quickly approved.  California is in the throws of a very extensive drought, and I cannot in good conscious continue to pour water on the lawn.  I personally don't find the aesthetics of a lawn to be very appealing in Southern California as it doesn't match the landscape or draw cues from it in any way.  At the same time, it will allow the front-yard to match the work we've done in the backyard so that there is more cohesion.  

With the approval from the Long Beach Water departments Lawn2Garden conversion in hand, we set off to complete the final drawing for the front-yard conversion.  We leveraged most of the same plants we used in the backyard when we worked with Randi at Tree of Life nursery to complete that design.  The numbers on the design correspond to the ID numbers on this plant list, which also shows watering requirements.  On the plant list, reference the 'Front Yard' sheet.  The plant selections changed very little from our backyard plant palette and that was completely by design.  First, we've had very good luck with all the plants we used in the backyard and have lost very few.  In addition, using most all of the same plants will help ensure a high-level of cohesion from front to back.  

Enough talking and more pictures:


Why such good luck with the backyard plants?  We planted in November of 2020 right prior to what rain we did receive that winter.  That proved to be very smart.  The plants thrived in the cooler temps and set roots very quickly.  Many sprang up and grew like crazy during the spring of 2021.  Some of the most vigorous were as follows:


  • Dana Point Buckwheat
  • White Sage
  • Yerba Buena
  • Calylophus Hartwegii
  • Ray Hartman Ceanothus
If fairness, all of the plants we've put in have performed like rock stars.  The above are some of the most vigorous.  Since May, 2021, we have set the low-pressure irrigation system to water 10 minutes (two five-minute cycles) every 15 days!  The watering requirements have been so minimal that it is making me consider not installing any irrigation at all in the front-yard landscape.  I have found that minimal water is required to nurse these plants to full health when planted in the fall/winter which prepares them to grow vigorously on what very little water they receive.  I intend to follow this model in the front-yard.  I will likely need to add minimal irrigation for the existing Japanese maple that is currently planted in the front-yard.  This tree has already reached full-growth or we would consider replacing it with a low/no water varietal.  There was a secondary non-native tree that had been planted that we removed.  Instead, we replaced it with the Ray Hartman (pruned up as a tree) which will better match our backyard design.

One of the big features in the submitted design is the addition of a swale and a small berm.  We added this feature on both the left and right side of the design.  In 2020 we installed gutters and drainage to funnel roof water to pop-ups in our front yard.   Based on the winter experience in 2020/21, we noticed that much of the winter rain flooded the front-yard and then ran onto the sidewalk and down to the nearest storm drain.  We plan to capture more of this precious water so that it soaks into the landscape.  The swales will prevent more of the water from entering the storm drain, and provide more growth potential for our native plants.

We anxiously await the Lawn2Garden approval of our submitted design.  We will be doing most all of this work ourselves in the September/October timeframe with the hope of planting come October/November of this year.  With any luck we will receive plenty of rain this winter.  If we don't, then at least we'll know that our landscape can tolerate what little supplemental water it will receive in spring/summer of 2022.

Sunday, June 20, 2021

Yep, more paint stripping

 In October 2020 we started the ever so fun job of paint stripping our dining room.  Here we are, June of 2021 and slowly but surely we're making process.  We started and completed numerous other projects in this time.  Paint stripping is one of those projects that just keeps giving week after week after week after week.

Earlier this year we discovered that the wall frame and panel was solid wood.  That significantly increased the scope of surface area to be paint stripped and refinished.  The following are the most recent progress pictures.

We dream of having this room fully done sanded and refinished by December, in time for a nice holiday party to show off the hard work.


Thursday, February 18, 2021

Slow Painful Progress


We are making slooooooooooooow painful progress stripping the original built-in cabinet.  Progress is extremely slow even with the Speedheater.  We learned during the process that the entire cabinet and all of the surrounding trim on the wall had been completely sanded down to raw wood.  We guesstimate this happened sometime in the 50s or 60s based on the nature of the oil based paint layers.  The extremely strong oil based paints made a VERY STRONG bond to the wood grain making it next to impossible to remove the paint.  

Throughout this process we have been using the Speedheater to remove as much paint as possible without damaging the wood.  When we scrape with too much pressure we gouge the wood, which we've  done in a number of places.  That will lead to more sanding and difficulty during the finishing process.  We have resorted to using chemical stripper to remove the final layers of oil paint that have adhered to the raw wood.  We are using Multi-Strip Advanced, which I have used in the past.  It is less toxic, but still pretty strong stuff.  The trick has been to leave the stripping paste on the surface for at least 10 hours before the final scrape.  It leaves quite a bit of paint residue, but we expect to be able to sand most of it out during the final finishing stage.

The good news is that we did a test run on the box beams and surrounding trim in the dining room and the original finish was not sanded off.  The Speedheater penetrates through the paint layers, softens the shellac layer, and the paint slides off like butter.  We are hoping that this cabinet and surrounding trim is the last of the sanded wood work.  Why would anyone bother to sand all of this and then cover it all up with paint?  Not sure we'll ever understand exactly what happened here.  The mysteries of an old house!

Tuesday, February 9, 2021

Another Win in the Finish Column


We took another project over the finish line this weekend!  This one wraps up the workshop makeover we started in January.  We got the workbenches and a really nice tool chest installed which mostly completes the space.  This small space was a big challenge, but we couldn't be happier with the outcome.  It is bright, well organized, and allows us to easily set up different tools depending on the type of project we are working on.  It is really nice to have this complete!  The sad part of finishing this means we have to stop procrastinating and start paint stripping the woodwork in the house again.  I'd rather do just about ANYTHING else .... :-)


Saturday, February 6, 2021

Lawn to Garden


After numerous walks around our neighborhood we have been considering a lawn to garden conversion.  There are quite a few people in our area that have done this.  Anyone else reading this blog been through this process in another city or in Long beach?  The city here offers a program to do this which includes a 3$ per sq ft grant.  The city recently replaced our street and curbs, and our front strip got pretty torn up in the process.  In addition, they took out the 40 foot tall eucalyptus tree that was located in the front yard along the sidewalk.  This has been an invitation for us to consider what to do with the small front-yard space.

I did a first draft landscape drawing of what it could look like should we choose to go this route.  Plants corresponding to the numerical identifier on the drawing can be found here.  I can't help but think that this would be much more visually interesting and require a lot less water.

Trying to convince myself not to do the conversion this year, but who am I kidding.  I might have this done next week :)

Wednesday, February 3, 2021

Final Push to the Finish

 Why is it that the final 10% of work on a project always takes such a massive effort to finish?  Perhaps because it is always detailed, or maybe it's the mental difficulty of pushing past the finish line.  Nonetheless, our studio makeover project was no exception to this rule.  It was one of the first projects to be started in January of 2020 and yet we just pushed it over the finish line this month!  

I am proud to report that all the door and window trim is in!  Even the baseboards are hung :). We trimmed the doors/windows using poplar and left it natural with a shellac finish.  We used the newly acquired planer to custom mill the board depths to match the craftsman detail of the house.  Overall, very pleased with the outcome and happy to have this marked off the list.  The project was an excellent test of the workflow of the newly remodeled workshop and we are pleased with the result.  Looking forward to moving on to a different room now...


Tuesday, January 26, 2021

Workshop Refresh

 Well, we never would've dreamt we'd be spending so much time at home in 2020 and 2021 working on home projects!  We've spent a lot of time in our modestly sized 12'x12' workshop.  Over the past year we've completed quite a number of projects and having this space has been helpful.  However, it was dark, cramped, and had some critter problems.  The old original sagging carriage doors definitely had issues and did little to protect the space.  Unlocking them and opening up the shop door was a 5-10 minute process.  Not exactly ideal.

We set out to reimagine this space knowing that we wanted a creative space that could support any number of hobbies.  I recently bought a small MIG welder in hopes of building some garden type features.  In addition, it would be nice to do some creative wood working projects as well as continue to support our home remodeling efforts.  I started the remodel process by drawing the space to scale and making cut-outs for all of our equipment.  I spent a good four weeks moving things around and tweaking the plan.  12'x12' isn't a lot of space when you are looking to house saws, tools, and workbenches.  I scoured the web for shop layout plans and youtube videos.  I found plenty of inspiration, but it still required a lot of modification to suit our specific needs.  

We finalized the plan in the last couple of months by making a couple of critical decisions.  First, we decided to remove the old carriage doors and have a garage door installed.  When working with large wood stock, it is sometimes necessary to have the door open to get the larger pieces through the table saw or planer.  Therefore, it was critical that the door be easy to use and open.  We plan to reuse some of the old wainscot stock from the removed carriage doors on the interior wall as a way to preserve some of the material and history.  And secondly, we decided to put all the wood working tools on mobile bases so they can be stored against the walls and pulled into the center when needed.  This allowed the space to be multi-use and not entirely dedicated to wood working.  

We are extremely pleased with the design, and have have completed much of the work.  We went with a vertical wainscot paneling on three of the walls and then plan to use the recycled vintage carriage door wainscot material on the garage door interior wall.  This material will be hung horizontally to provide contrast, and will be planed down so that it is a simple raw wood with a clear finish.  We have since worked on a couple of projects in the space, and are pleased with the workflow.  The brightness and openness of the design makes it much easier to work in the space and to see what you are working on!  Soon, we will be installing an L shaped set of workbenches on the right side and back wall and plan to build some overhead cabinetry for tools and additional storage.  We look forward to many future projects working in this bright and comfortable space.


Saturday, January 2, 2021

Winter Planting


We've been focused on the landscape plantings to capitalize on the cooler temperatures and what little rain we've been receiving this winter.  Having grown up in the midwest, I'm still adjusting to the climate in southern California and the idea that some plants grow all year long.

We visited the Theodore Payne Center just north of Burbank today.  Much of the gardens are closed, but the plant nursery is open.  Today we found the following plants on our list:

  • Juncus Patens, both Elk Blue and Occidental Blue
  • Bouteloua Graciis
  • Heuchera 'Opal'
  • Gambelia Speciosa, Firecracker
  • Ceanothus Joyce Coulter
Our experience at Theodore Payne was good.  You can find their inventory online which is updated regularly.  This was extremely helpful and allowed us to plan our visit based on what was available.  Once at the nursery we found the signage and layout to be very good.  We were able to identify everything on our list in around 20 minutes.  Each pot is labelled, and therefore it made it much easier for us.  We will definitely continue to use them as a resource as we build out our native plant landscape.  We found that there were plants and Theodore Payne not at Tree of Life and vise versa.  Definitely check out both as you build out your native landscape plan.

We are down to two plants left on our list that we have yet to find.  We're hoping we'll luck out later in the spring as the nurseries begin putting out new inventory.  We're excited to see everything start to root-in and grow during the winter and spring months.

A pretty good start to 2021.