Saturday, August 7, 2010

Summer project progress photos

We're slowly working towards completion on a couple of our ongoing summer projects. Here are a couple of progress photos:

House painting:

From The Making of a Craftsman Home


Potager brick paths and patio area:

From 2010 Landscape

Sunday, July 25, 2010

Our urban wasteland kitchen garden

Our kitchen garden started out as a driveway if you recall. Last year we managed to break up and haul out 30+ tons/1800 sq. feet of what was the former driveway. Don't worry, we still have enough driveway to park three cars. This newly claimed area was to allow for two additions: a kitchen garden and an orchard. The orchard is well on its way and the 7 new fruit trees are all doing well.

From 2010 Landscape


I've been a little behind on the kitchen garden/potager. First, this area looks a lot like an urban wasteland since it's as hard as a rock, has poor drainage and not a stitch of plantable soil. Pretty much the single worst set of qualifications for a kitchen garden. Earlier this year I wrote about the project plan for this area and how we're going to transform it into a kitchen garden/green space.

To start the garden project, in the last couple of weeks I managed to get the concrete block retaining wall installed that borders between our kitchen garden space and the 5+ acre lot next to us. The property line is marked with a low creek area that flows with water all winter and helps prevent us from floating away. To help prevent erosion and minimize the risk of flooding, we installed a retaining wall and dug the creek out. In addition, we're raising the soil level of our property approximately 4".

From 2010 Landscape

My least favorite aspect of this project is that when it's all said and done, you won't even be able to see this retaining wall since it will be behind our fence. It was just one of those necessary projects that had to be done to move to the next step.

After finishing the retaining wall, I started laying the brick paths. The kitchen garden is a long shotgun area (18'x36') and will be a high trafficked area since it's the main way to get to the back of the house. Therefore, I wanted permanent paths that were wide enough to haul supplies and lumber to the back where our workshop is located. Today, I completed the first section of the path using brick I found on Craigslist.

From 2010 Landscape
This path will tie into a small 9'x10' patio that will be directly viewable from the picture window in our dining room, and will then connect on the other side with another short path that goes to the gate to our backyard.

As you can see from the picture, the area is very rocky. The dirt is hard packed clay that's impossible to get a shovel in. Eventually, to finish this area I will be building a series of 10+ raised beds for planting in. Once the raised beds are built, I'll haul in decent soil soil. I don't expect to start getting the raised beds built till next year, but it's a perfect late winter/early spring project.

I hope to complete all of the brick work for this by the end of August. I have to balance this task with painting windows and trim, since we're trying to finish up the house painting project. Before you know it, it'll be the rain season here again, but at least this year I'll be standing in front of the picture window looking out and admiring the nice brick work.

Sunday, July 18, 2010

Pond 2.0

What's better than a pond? A larger one. We've thoroughly enjoyed our pond, but we've always wished it was bigger. Water is a very addictive thing. To enlarge our pond, we'll be building a second pond, and then joining the two ponds together. To enlarge our existing pond without building a second one would require deconstructing the entire thing. This just isn't an option right now.

Here is a picture that describes the idea:

From 2010 Landscape

The new pond will be a maximum of 20" deep to allow for easier installation of aquatic plants. Here is a picture of the new pond site being dug out:

From 2010 Landscape


In the back of the photo is the skimmer we'll be installing in the new section. My hope is that it'll make this new pond more maintenance free by collection more debris, leaves, etc.

Friday, July 2, 2010

Now! with New Improved Franken Heater!!

Now that Summer is in full swing, (62° today), It is time to pull out the scaffolding and start scraping the paint off the house again.


Last year I finished about 80% of the house with the angle grinder and a thing called the "Paint Eater". The term "laborious" is the only way to describe the process of grinding 80 years of paint off the soft cedar siding.

This year however I have a NEW method.


Having a friend who raves about the "Silent paint remover (SPR)" I considered buying it last year at the start of this project. Since I could buy the paint eater heads for $15 and they fit on the angle grinder I already owned I decided to go the cheap route and not invest in new equipment. I had read and considered the DIY version of the SPR. Since it is my nature to be cheep I went ahead and ordered the parts and built my own with a few modifications.
Instead of insulation I spent an afternoon drilling as many holes in the housing as I could. Careful to not breach the division between reflector and housing. This seems to dissipate the heat that would otherwise build up near my hand and around the electrical components. Also I built my handle a full 5 inches away from the housing and with an extension to one side so I did not have to hold it directly behind the heater. This also has the added bonus of making the whole unit look like some Medieval weapon which gives me a +2 to moral to keep the unit hefted in awkward positions on the side of the house.

My immediate conclusions are that this seems to still be "Laborious" but it may be slightly faster than the grinding. As an added benefit the 80 years of paint is all primarily piled up on the tarp below me and not vaporized into my new garden. This fact is enough to say this method wins over the grinding.

Saturday, June 19, 2010

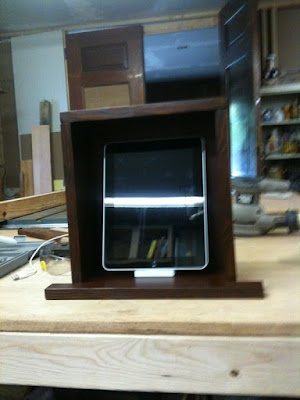
Built-in In-wall iPad Cabinet

Yes, I was one of the crazy people who stood in line at the Apple store for hours the day the iPad was released. I'm a bit of a gadget geek, and I knew my life wouldn't be complete without the "magical" device.

For years I've contemplated the idea of a kitchen computer to control music, look up recipes, surf the web, etc. We already use our iPhones for this purpose, but this would be a dedicated device that would remain in the most trafficked room of our house, the kitchen. Most computers are just to large and obnoxious for the kitchen, especially if you're going for a more clean look. The first time I saw the iPad, I knew that it was the perfect device for the kitchen -- small, sleek and keyboardless. That set of this little project.

The idea came from the built-in cabinet for a telephone you'll find in many older homes. From there, we began sketching and coming up with the right dimensions, including depth to make sure you'd be able to get your hands beside and behind the device to lift it out of its dock.

During the prototype phase, we came up with this:

From iPad Built-In Cabinet


From iPad Built-In Cabinet


From iPad Built-In Cabinet


Once the prototype was complete, we assembled and installed in our kitchen. The fact that we already had the walls torn out made installation all that much easier.

More photos:

From iPad Built-In Cabinet


From iPad Built-In Cabinet


From iPad Built-In Cabinet


We fastened the dock into the cabinet so that it can lift out without also picking up the dock. We did this by using a copper strip that was hand hammered to give it a finished Arts and Crafts look. It was fastened down using some finishing screws.

From iPad Built-In Cabinet

From iPad Built-In Cabinet

The cabinet is built using 100% recycled material and wood scraps. We put the back on a hinge so that the cord can be passed through the back to be plugged in. The back latches closed.

All in all, we're extremely happy with the cabinet and the device. The speakers throughout our house are wirelessly fed using Airport Express devices, so we're able to control our music library, and the rooms the speakers are turned on in all from the iPad. I highly recommend the Epicurious application for recipes. The device also acts as a great in-wall picture frame to feature family photos.

Mastering the Art of French Doors

To continue with the door theme, we recently installed a set of french doors in the kitchen. This particular set replaces one of the windows on the South wall of our kitchen. The doors open out onto the future home of our outdoor kitchen dining area, which is a project for a different day.

The removed window is being kept to be installed on the North wall of our library. At one time there was a window in there, but somebody removed it. I have no idea why someone would take time out of their day to remove windows, but obviously somebody had way to much time on their hands.

The project in pictures:

From The Making of a Craftsman Home


From The Making of a Craftsman Home


From The Making of a Craftsman Home


From The Making of a Craftsman Home


From The Making of a Craftsman Home


The paint will be stripped off the inside of the door and stained, and the outside will be painted. The outside of the house will be trimmed around the door to match the rest of the trim, and the cedar siding will be repaired.

Sunday, June 13, 2010

Mulching

I'm not a fan of mulching, but it's pretty much a requirement here unless you want to fight weeds the rest of your life. I've been collecting cardboard boxes all winter to complete this job. First, I break down the boxes and lay them on the ground, and then I cover them with the bark mulch. The combination is a really good mulch and weed suppressant.

I added a new section called Landscape under the Features section in the left-hand navigation. This area contains a photo gallery of landscape photos taken during the 2010 season.

Happy spring/almost summer everyone.


From 2010 Landscape


From 2010 Landscape


From 2010 Landscape