We're putting the final touches on one of the upper kitchen cabinets. For this project we're using an existing cabinet box that we painted and modified with a side shelf. To accomplish a frame and panel look, we've used thin recycled top nail wood flooring. The following is a gallery of images. In the coming week I'll post a picture of the cabinet once it is installed. For more information on this project and others, visit the Woodshop Projects link under Features.
Thursday, January 6, 2011
Saturday, January 1, 2011
Kitchen progress and fireplace...
 We got the first coat of paint up in the kitchen over the Christmas break. It's nice to finally look at something other than blue board drywall! It completely changes the room and makes it much more warm. We're happy with the color choice so far. It makes the reds in the woodwork really pop.
 |
 Over the winter break we had a wood burning fireplace insert installed. We're spending ample time with the cats laying in front of the fire enjoying the snap-crackle. Happy New Year everyone!
Wednesday, December 29, 2010
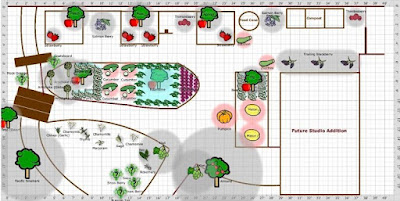
2011 Gardening Plan
I've posted the 2011 garden plan to the blog. Full details can be found by clicking the Landscape link under Features in the left-side navigation or by clicking here.
This year I've been using an online program called GrowVeg.com to build garden plans. This software allows you to easily draw on various plant varieties, and it will automatically calculate the number of plants in a specific area. I have found that it does not follow bio-intensive plant densities, which I generally use. I have found using bio-intensive planting useful to reduce weeds. In addition, the program allows for successive garden planing and much more. A friend of mine and co-blogger at GrowingAppetite.com has been collaborating with me on a seed and plant order list using Google Docs, which is another great garden planning tool. Using Google Docs, we can complete our plant list, and then decide who should start what what since greenhouse/coldframe/windowsill space is limited.
This year I've been using an online program called GrowVeg.com to build garden plans. This software allows you to easily draw on various plant varieties, and it will automatically calculate the number of plants in a specific area. I have found that it does not follow bio-intensive plant densities, which I generally use. I have found using bio-intensive planting useful to reduce weeds. In addition, the program allows for successive garden planing and much more. A friend of mine and co-blogger at GrowingAppetite.com has been collaborating with me on a seed and plant order list using Google Docs, which is another great garden planning tool. Using Google Docs, we can complete our plant list, and then decide who should start what what since greenhouse/coldframe/windowsill space is limited.
2011 Landscape Plans
All new 2011 landscape plans.
Potager kitchen garden plan. Click here to see a larger version.
 |
From 2011 Landscape |
Click here to see a list of plant varieties we're planning to use. All seeds and vegetable plant starts are ordered from Territorial Seed Company. Edible fruits are through Raintree Nursery. PNW natives are through Woodbrook Nursery. This list will continue to be edited throughout the next couple of months. Check back for more details.
Orchard garden plan. Click here to see a larger version.
 |
From 2011 Landscape |
Monday, December 27, 2010
Kitchen Progress
It's been awhile since we've posted. We're busy at work finishing up the kitchen remodel. We're 2 years into this project, and will be very happy when it's done. This has been a part-time endeavor, as many other projects have taken precedence and prevented us from completing this project.
We finished the drywall sanding and the next step is to prime and paint, which with any luck that will be happening this week. Take a look:
 After months of deliberating on colors, etc. we finally decided on the final pallet. The solid color to the left (Hubbard Squash @ SW) is the base wall color, and the paper is a border from Bradbury & Bradbury Art Wallpapers that we plan to use around the dining area of the kitchen.
Other kitchen news:
We finished the drywall sanding and the next step is to prime and paint, which with any luck that will be happening this week. Take a look:
 |
| From The Making of a Craftsman Home |
 |
| From The Making of a Craftsman Home |
Other kitchen news:
- No more knob and tube wiring.
- We've decided to paint the cabinets as opposed to trying to refinish them (they're pickled oak). More on that soon.
- We're making room for a wall of ovens (double oven + a separate microwave).
- We're looking into having gas installed for the cooktop.
- We've acquired hard maple countertops that we'll be installing.
There is a lot happening in this room. It's definitely at a turning point where things should start coming together much faster. I already like using it more and it's not even finished! That might have something to do with the professional series copper color KitchenAid mixer I bought us for Christmas :-)
Sunday, October 31, 2010
2010 Projects in Retrospect
 Each year we share a list of all the projects we've worked on as a reminder of what we've accomplished. For me, the end of the year is signaled by the steady rains here in the Pacific Northwest, and by the falling leaves. For us life takes on a slower pace this time of year; one that makes more room for relaxing, enjoying classical music, eating hardy foods, and enjoying our home.
The following are highlights of our major accomplishments in 2010:
Orchard
We started constructing the Orchard in the fall of 2009. In the spring of this year, we figured out we were going to have to raise the beds to prevent our fruit trees from floating away. The 9 fruit trees we planted this year are all doing great! We hope to have our first mini-harvest next year. Trees include: peach, pear, apricot, apple, plum, cherry, fig, almond and mulberry.
Before:


After: |
| From 2010 Landscape |
Potager
Project: convert the former driveway into a kitchen garden. In 2009 we removed the driveway, and this year we cleared and installed hardscaping and fences. In 2011 we will install raised beds and plant. This was one HUGE project, and we're excited to almost have this complete!
Before:
 |
| From The Making of a Craftsman Home |
 |
| From The Making of a Craftsman Home |
After:
 |
| From 2010 Landscape |
 |
| From 2010 Landscape |
House Painting
This is perhaps the largest house project we've ever taken on. We started this in 2009, worked on it throughout this year, and plan to finish the job next year. We've got all but the rafter tails and underneath the eaves painted. We're SO CLOSE!
Before:
 |
| From The Making of a Craftsman Home |
 |
| From The Making of a Craftsman Home |
After:
 |
| From The Making of a Craftsman Home |
 |
| From The Making of a Craftsman Home |
Kitchen French Doors
The master plan for our craftsman home is to bring the indoors out. To do that, we're incorporating rooms into the landscape. Off the kitchen, we installed a set of french doors that will open out onto the outdoor dining room.
Before:
 |
| From The Making of a Craftsman Home |
 |
| From The Making of a Craftsman Home |
After:
 |
| From The Making of a Craftsman Home |
 |
| From The Making of a Craftsman Home |
Pond Expansion
Water is a powerful landscaping focal point. We enjoyed our first pond so much that we decided to add a second and join the two together!
Before:
 |
| From 2010 Landscape |
 |
| From 2010 Landscape |
After:
 |
| From 2010 Landscape |
Native Landscaping
We brought in 100+ individual plants that we added to the backyard landscape, all of which are Pacific Northwest Native. Plants include: Deer Fern, Sword Fern, Ninebark, Spirea, Flowering Currant, Columbine, Bullrush, Cattail, Snowberry, Serviceberry, Coastal Strawberry, Oregon Ash, Cascara, Bald Hip Rose, Lupine, Slough Sedge, Bald Hip Rose, Rhododendron.
Before:
 |
| From 2010 Landscape |
 |
| From The Making of a Craftsman Home |
After:
 |
| From 2010 Landscape |
 |
| From 2010 Landscape |
 |
| From 2010 Landscape |
In Reflection
 The outdoor landscape plan really started to take form this year. Our plans are very ambitious, and the work we've put in is paying off! We've got a long ways to go before we're done, but I can see the light at the end of the tunnel. I'm excited about the mix of Northwest Natives and edibles we planted this year. Once the fruit trees, kiwis, blueberries and other edibles we planted get established, we should start seeing a nice bounty of fruits and vegetables. The work we've done to integrate the house into the surrounding landscape seems to be taking shape.
Our indoor house plans are coming along, albeit a bit slower than what we had hoped for. The kitchen remodel is entering a significant phase now that much of the drywall is finished. Getting the plumbing and electrical work finished has slowed the process down a bit, but we're making good progress.
What's Next?
This winter we'll be focusing a lot of our attention on finishing the kitchen. We'll have more progress photos to post of that project soon. In the coming months we'll start figuring out what projects are going to make the 2011 list. Next year is going to be the frosting on the cake for much of the landscape plan. We're also working on the plans for a very cool work/art studio addition to the front of our workshop. We'll be posting a rendering of our design plan, and hope to start getting bids for the project next year. 2011 should be another action packed year!
Friday, October 22, 2010
Matching Door Lintels
Craftsman homes always have a handful of special details that make them stand out. On our house, each door, window and porch is decorated with a custom lintel. We like to refer to them as the door/window eyebrows. We've added a couple different sets of custom doors, and we have a lot more custom work to do. It's important to us to preserve the original details of the house, and to do so, we first had to find matching trim stock. After paging through catalogs of trim stock at McClendons, we identified identical trim. That's good news, because if we didn't find it, we were going to have to custom build it ourselves, or have someone else match it and cut it for us.
The top lintel looks like this:
Pictured on the right is an example of the original. The is made up of three pieces: the flat stock, the trim, and the top cap that is beveled to shed water away from the house. The one of the left is the replica built to surround the french doors we added in the kitchen earlier this year.
The finished product after installation:
It makes such a huge difference having these details carried on throughout the house. Eventually, we'll be adding these details to the workshop windows and the other set of french doors we installed off the library. Now that this proof on concept is complete, we're confident we can build these and make them match the house exactly!
The top lintel looks like this:
 |
| From The Making of a Craftsman Home |
Pictured on the right is an example of the original. The is made up of three pieces: the flat stock, the trim, and the top cap that is beveled to shed water away from the house. The one of the left is the replica built to surround the french doors we added in the kitchen earlier this year.
The finished product after installation:
|
| From The Making of a Craftsman Home |
It makes such a huge difference having these details carried on throughout the house. Eventually, we'll be adding these details to the workshop windows and the other set of french doors we installed off the library. Now that this proof on concept is complete, we're confident we can build these and make them match the house exactly!
Sunday, October 3, 2010
Pond progress
This weekend I completed joining the two ponds together into one larger pond.
To join the ponds, I dug a section between the two, laid a new piece of liner, and fused the pieces together using an EPDM pond liner joining kit.
Shown here is one section of the two EPDM pond liners, with one piece braced to a 2x6 ready to be joined together.
Right after the sections were joined, and the water level was brought up. The connector section will be covered with a plank style bridge, so the two sections won't look so obviously joined together once complete.
Once the plank bridge and landscape rock is in place, I'll upload the final pictures.
 |
| From 2010 Landscape |
To join the ponds, I dug a section between the two, laid a new piece of liner, and fused the pieces together using an EPDM pond liner joining kit.
 |
| From 2010 Landscape |
Shown here is one section of the two EPDM pond liners, with one piece braced to a 2x6 ready to be joined together.
 |
| From 2010 Landscape |
Right after the sections were joined, and the water level was brought up. The connector section will be covered with a plank style bridge, so the two sections won't look so obviously joined together once complete.
 |
| From 2010 Landscape |
Once the plank bridge and landscape rock is in place, I'll upload the final pictures.
Subscribe to:
Posts (Atom)