I'm a bit of a perfectionist, and when I get my mind stuck on something, no alternative is good enough. This can be a good trait and a bad trait, depending on what you're trying to accomplish. If you have a real affinity to do things right it can be great, but sometimes when you just need to get something done, it can be your own worst enomy.
I've been laboring over the stain color in the house for some time now. Which is right? Light, dark, medium? What type of stain? Should we shellac over it, or just use a linseed oil? perhaps a nice wax finish would be good.
The
pieces of furniture we rescued from the house
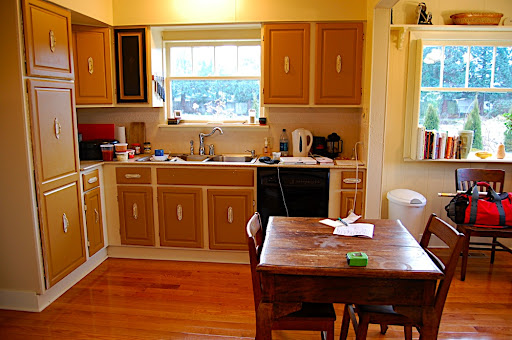
slated for demolition simplified this decision making process. No way were we going to strip these amazing cabinets and try to refinish them. The color was splendid, and they had the patina you only get with time. So, the decision was simple -- we'll just stain all the wood in the house the same color as the cabinets. Next step, match stain.
Finding a way to match stain when you're a perfectionist is not a simple task. First, Kurt visited with a number of woodworking shops, and they all referred us to their sample books. The problem was that we were not finding a match close enough to call it good. Then came a suggestion Kurt got from someone at work -- contact
Dalys.
Dalys is amazing. It's a Seattle based company with an
interesting history that makes stains and other wood finish products. And guess what else they do... THEY MATCH STAIN! You can go in and look at their samples and pick from their pre-mixed recipes, but lets face it, stain color is all about the wood it is applied on, and you'll rarely find something that's an exact match. Dalys will do a custom stain match for the very low price of 20 bucks.
20 BUCKS! Hell, you can spend that at Starbucks in less than a week.
We took a peice of wood in from our cabinets that was the color we wanted matched. We also took in two peices of unstained wood -- douglas fir and western hemlock. In about 4 days, Dalys called us and our custom match was ready.

Because the stain color we're matching is so rich and pigment loaded, Dalys had to go with a two step process. The first layer is a pigment loaded dye, which is the first coat you apply. The second layer is a stain, which is applied on over the dye. We purchased a gallon of each, and we're told that's enough to stain approximately 400 sq. feet. That should get us pretty far into our project. Our plan is to use this color on all the wood trim, the wainscoat, the boxbeams, etc.
Our first application was the new 3 panel door Kurt installed in the dining room that leads upstairs. He finished the door jamb, and the trim that goes around the jam. It looks really terrific and we're happy to have the color peice of the puzzle solved.
Restoring a house is a chore, especially since real craftsman with expertise in their field are hard to come by. If you too need to match stain color, I highly recommend Dalys. We need more local independent businesses like theirs. Be sure to check them out.
 Thankfully, Santa was nice enough to secure the purchase of this item for me (he has yet to deliver it down the chimney). What makes this settle special is that it comes with a story. This particular settle has been in the same family for three generations. That's a bit of history that you don't always get when you purchase something at auction or at an antique store. Originally, this settle had a leather bottom cushion and pillows. Unfortunately, the brutal Tacoma weather has not allowed us to retrieve the it yet, but I'm happy knowing that it'll be mine soon! In time, I'll refinish the bottom cushion, and have back pillows made. I'm leaning towards leather upholstery just as it would have had originally (see photo below).
 In Picasa, I keep a photo album containing pictures of furniture and design elements I like, so that I can refer to them at a later date. I like to think of it as the Sears catalog picture clipping of the future. I recommend doing this, because as you visit sites and look at books you'll gather a lot of ideas. This particular photo is of a settle I fell in love with. I present this to give you an idea of what the cushions will once again look like when complete.